![]()
5-24-08
 |
 |
|
While Jeff read the building plans and made sure all the windows and doors were marked on the outside walls, Paul and Ted brought over the logs for the first floor girders and girder supports. |
With one of the logs difficult to reach by tractor, Paul drove the excavator out to the racks and just reached out and picked up the log. |
|
 |
 |
|
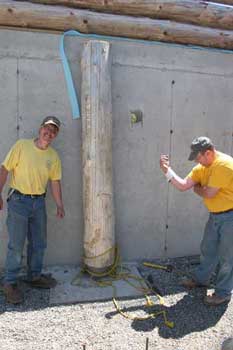
One of two logs that will be cut up into short posts roughly 8 feet tall. |
Setting the west outer post on its pier. To accommodate the 1/2" rebar pin in the center of the pier, a 5/8" hole was drilled in the bottom center of the log. |
|
 |
 |
|
Most of the cutting and drilling was done outside, then the volunteer muscle carried the posts to the piers. |
Tipping the east post upright next to its pier. |
|
 |
 |
|
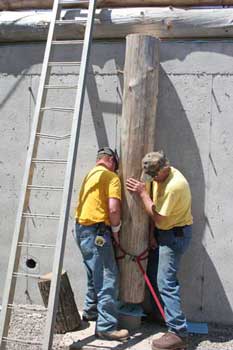
That wasn't so hard. Now comes the tough part. |
Rigging rope below some knots so the boys can lift the pole up and onto the rebar pin. |
|
 |
 |
|
Ready? 1...2...3........ |
Ted lets us know that he could have done it himself. |
|
 |
 |
|
|
After saddle notches were carved into the tops of the end support posts to prevent any tendency for the girder to roll, it was time to lift the girder over the wall. |
It was sure nice to have the excavator for this job. |
|
 |
 |
|
With two chain slings properly positioned on the log, a simple tip of the bucket could also tip the log. This gave us added control. |
Ted guides the east end of the girder into the saddle notch. |
|
 |
 |
|
John sat up on the wall as a translator between the crew inside the house and Paul on the excavator. |
Jeff adjusts one of the slings before they set the other end of the girder. There's our friend Tom looking on. He came out for a few hours in the afternoon. |
|
 |
 |
|
Jillena also came out to help for a little while and took a few pictures so Jeff could lend and extra hand. |
An interesting view of the excavator reaching over the wall. |
|
 |
 |
|
While setting the west end of the girder, the crew decided they should bolt the post to the wall first, to keep it steady while setting the girder. |
With the girder resting against the wall, the posts were fastened using a concrete anchor and 3/8" threaded rod. |
|
 |
 |
|
John taps the threaded rod through a 1/2" hole near the top of the post. There's Tom looking on again. He sure does a lot of that. |
Jeff cut the sections of rod, buffing the ends to make sure the nuts threaded on properly. Looks like it's almost time to replace the cutoff wheel. |
|
 |
 |
|
John tightens up the hardware on the threaded rod. |
Guys sure do love power tools. Jeff prepares to use the rotary hammer to drill the hole for the concrete anchor. |
|
 |
 |
|
Using a string and a short section of chain for a plumb line, the post will be adjusted for plumb front-to- back, and side-to-side. |
With the threaded rod fed through the hole in the post and its spot behind the post marked on the wall, Jeff drilled the anchor hole and John tapped in the anchor while Ted held the post to one side. |
|
 |
 |
|
It's now back to lifting the girder back onto the posts. |
Guiding the east end to the saddle notch. |
|
 |
 |
|
Swinging the west end over to the saddle notch. |
With the girder set, Jillena spent a few more minutes drilling the rest of the holes on the 5th course log on the east wall. Then it was back to the baby. |
|
 |
 |
|
That was about it for the day. Before Paul and Jeff wrapped up, they took some measurements off the sill around the chimney and marked some pressure-treated boards for installation the next day. |
Today's accomplishment: one 1st floor girder set on two outer support posts. |
|
| <-- BACK TO CONSTRUCTION (PHASE 3) PAGE |
BACK TO OUR LOG HOME MAIN PAGE
If you have any questions about this website, e-mail us at stargazer@stargazerpics.com.
HOME | aurorae | moon & lunar eclipses | night sky shots | landscapes | animals unique shots | our wedding | Alaska 2006 | our log home | Stephen | Oliver | Alistair |
These pages and their contents Copyright © All Rights Reserved.